
General Information
Grille & Tail Work Repair and Restoration Business
-
The Trim Master is Dana. He's doing a few little things on the side now and then. His email address is pnwcudaman@gmail.com.
-
-
As an alternative, the main focus of my shop is custom powder coating (Mopar parts restorations and custom one-offs) but Dana's been instrumental in helping me get up to speed on trim resto too. I don't do it full time by any means -- mostly to fill the void in the industry since so many of the good ones are now out of business -- but if you aren't in a hurry, shoot me a few pictures of the parts with close ups of the nastiness and I'll get back to you. My shop's in northwest Tennessee and I ship stuff all over the world.
-
-
Leanna the CudaChick -- Phoenix Specialty Coatings
-
Owner/Operator
-
PHOENIX SPECIALTY COATINGS
-
Where Your Parts Are Reborn
-
731-613-9192 (10-9 Central time)
-
PhoenixSpecialtyCoatings.com
-
-
-
AllTrim restores front end trim. They’ll work on the headlight bezels and grille surrounds. Make sure rechroming is specified in the part of the work order. If not you may notice pitting on the pot metal ring that encircles the headlight. You won’t notice unless you get right up to the headlight.
-
Jeff Ramin - ’67 Coupe
Trim Work Literature
-
There is a good book on refinishing trim by Jeff Lilly called "Refinishing Automotive Trim”.
Paint Remover
-
Anyone know of some good paint remover for chrome and aluminum trim?
-
-
I have tried using 0000 steel wool. But there are some areas that a just real stubberin’.
-
Robin Findlay
-
-
There a couple of ways to do this;
-
One would be taking the parts and boiling them with soup, of course if the parts are large that is out.
-
After they have been heated for a while the paint starts to soften, then you need to pick it out, brush it or scrub it. It work okay, but does take some time
-
-
Two would be a chemical stripper, I have used one called Low Odor Aircraft Remover by Klean-Strip. This stuff is thick and supposed to be made for aluminum. If you go this route, be sure to test it first on a small spot of the metal. This stripper is available at my local parts stores, here in Ohio.
-
Eric Valentin - ‘69 B5 408 Fastback
-
-
Eastwood has an anodize remover for aluminum parts and fittings.
-
-
When doing trim resto I usually have to enlist some Easy Off oven cleaner to get rid of the old anodizing. It works VERY well on the paint overspray too. If you've never used lye before, then call me (or do a little research on the 'net first) -- I've got a few tricks to share that'll speed up the process and not ruin the parts.
-
Leanna ~ The CudaChick
-
-
I have used the Easy Off, on this part and on other trim I have redone. the Easy Off usually gets a lot of it off, and that which remains in flat spot can be sanded off,( the alu parts) I am having a problem with small spots in corners and inner 90 deg. bends.
-
Grille Trim
Grill Surrounds
-
Each year is different.
-
-
‘67 and ‘68 have the same shape grills (interchangeable), with very similar surrounds, but the structure and materials are different. Where they meet in the middle it looks like an X. In ‘67/’68 the grill inserts "float" -- you can reach in behind them to access the hood release. You can also distinguish the ‘67 and ‘68 by the rear grill supports.
-
-
The ’67 grill is all metal. (survived better & more easily repairable, common)
-
-

-
-
The ’68 grill is metal & plastic.
-
-
The ’69 grill is plastic. (almost always cracked, is the rarest)
-
-
‘69 is a completely different shape -- where they meet in the middle it looks like a Y. The grill mesh on the ‘69 fills the entire opening. The hood release is under the car. Grilles for a ‘69 are considered some of the rarest unobtainium in the Barracuda world.
-
Max Heim - ’67 Fastback, ’67 Conv.
’67 Grill Restoration
-
You can restore a ‘67 grills using rivets and a tubular rivet setting tool from an industrial distributor called Spaenaur located in Kitchener, On Canada.
-
Rivets are set by hand using a vise as an anvil. No problem. Here is a link to the page.
-
Jacques Bouchard - ‘67 Barracuda Coupe
-
-
The rivets can be purchased here http://www.rivetsonline.com
-
-
A tool I recommend and use to re-install the rivets can purchased here
-
-
That tool is very inexpensive and works well for the grills and ashtrays.
-
Gerald Drury
-
I found the "right" hardware to reassemble ‘Cuda grilles at Fastenal. It's not cheap -- but it fits and it looks good.
-
Leanna ~ The CudaChick
-
A pair of ‘67 grilles, restored, polished and painted, go for $700 plus shipping.
’69 Grill Restoration
-
The inner trim ring can be removed. Drill out the semi-tubular rivets. The trim ring at the back of the grill surround (in front of the egg crate grill can be removed. If the surround it busted, transfer the grill to a new one. There are plastic rivets of some sort.
-
-
Concerning the rivets that hold most of it together, use 1/8 tubler rivets in 1/8th and 1/4 length. Most companies would not deal with me for small qualities. I found a company that would sell me $70 worth so I had to get 4000 of each to get the order.
-
-
Buy the Tubular Rivet Clincher Tool. This tool is used to restore vintage and antique toys. The tool is easy to use it just like a clamp just twist them into place. The overall look is great, and I am very happy with them.
-
-
You can get the rivets much cheaper and in smaller quantities from www.rivetsonline.com. Now that you have the tool it can be used in many more locations on your car should you need it. I have tried to get others to look at them and believe the holding power far exceeds pop-rivets.
-
Gerald Drury
-
Leanna recommended Fastenal as a rivet source.
-
-
My '68 FB rivets in the aluminum grill were steel and a real PITA to get out (read as dremel grinding). I'm using aluminum rivets as replacements.
-
-
I'm just using a hand pop rivet tool. I also found some bevel headed machine screws (6-32 x 1-1/2 ??) at Fastenal to replace the insert mounting screws since several of mine were broken off. Once the pieces are riveted together, the bevel head screws are clamped in place and will resist rotating like the original mounting screws.
-
Steve Toth
-
-
To finish, remove anodizing, polish, re-anodize or clear coat.
’69 Grill Plastic Restoration
-
50 year old plastic on our cars is known to become brittle, shrink and crack. For the surround, there are several ways to restore the plastic. The key to repairing a split or break in the original plastic is to expose fresh material for the bonding agent. Use a Dremel tool to clean up any open or jagged edges.
-
-
Some plastic restoration sealants can be pretty pricey. Plastic repair kits are available from Auto Zone or one of the other stores. It is a smelly putty like paste, that bonds and also fills cracks like body putty.
-
-
Many choose to use a two-part catalyst such as JB Weld to adhere and fill gaps. Another way is to use a pencil-type soldering iron to the cracks to fuse the plastic back together, then sand it down and fill in with PC-7, then sand smooth. PC7 can be used on the surrounds or other epoxies are available.
-
Craig Tassin - ‘69 Cuda
-
-
Find the correct stuff and take your time. Use it on the back surface with some fiberglass to reinforce the area.
-
Eric Valentin - ‘69 FB
-
-
If the cracks are too wide to simply fill in, use small patches of scrap metal to bridge the gaps, adhering them to the back of the plastic panel.
-
Note: molded plastics have a tendency to return to their original shape and contour.
-
-
When dry sand everything as close as possible to maintain the profile and contours. You can wrap a socket in sandpaper for the proper radius and start sanding the now fully cured sealing compound. Start with 60-grit and move to a finer 220-grit to knock down the cured compound. Continue sanding and filling any exposed pours and fissures, patching cracks, and filling in small holes where you find them.
-
-
Then shoot it with some spray paint to cover and seal.
-
Anodizing
-
With aluminum pieces you have to remove the anodizing on the surface. I use Easy Off oven cleaner sprayed on and left for about 15 minutes then thoroughly rinsed off with water. You will be able to see any anodized patches left that need further treatment if any. Stainless doesn't need this.
-
-
Grill Screws
-
The grill hex head screws are 8x32. They are usually very rusty and getting off the nuts involves a torch. Next will be a couple hours of cleaning up the studs in the chrome frame. Wire-wheel them and bathed them in WD40.
-
Jeff Ramin - ’67 Coupe
-
Bevel headed machine screws (6-32 x 1-1/2 ??) at Fastenal can replace the insert mounting screws any are broken off. Once the pieces are riveted together, the bevel head screws are clamped in place and will resist rotating like the original mounting screws.
-
Steve Toth
-
-
For studs (the bolts that hold the grill to the front nose) use #6 or could be #8 fine screws and brazed them into the holes left by the old bolts. Brazing is another form of wielding, the temp is not as hot as welding so it dose not destroy the thin frame metal. On a down side it is not as strong as welding, but there is not that much force put on them.
Grille to Header Screws
-
The finish could be also be Zinc (yellow) dichromate & there is no gimlet point on the screw.
-
Lower bolts thread into pinch weld insert on support bracket.
-
Grill Rivets
-
For the '68 FB, the rivets in the aluminum grill were steel. They are a real PITA to get out. Use a Dremel for grinding off. Consider using aluminum rivets as replacements.
Aftermarket Grills
-
Classic Industries has the '67 and '68 grilles.
-
Grilles for a ‘69 are considered some of the rarest unobtainium in the Barracuda world.
-
Josh Walton - ’68 Conv.
-
-
Surrounds:
-
http://www.classicindustries.com/product/mopar/parts/MA2467.html
-
Screen Inserts:
-
http://www.classicindustries.com/product/mopar/parts/MA1156.html
-
Inner Trim:
-
http://www.classicindustries.com/product/mopar/parts/MA1157.html
-
Outer Trim:
-
http://www.classicindustries.com/product/mopar/parts/MA4738.html
-
-
And coming soon, a complete grill assembly. # RM4134. Price is $1727.99. a pair
-
Josh Walton - ’68 Conv.
-
-
Classic Industries gets these parts from PG Classics. B/E & A also gets these parts from PG Classics.
-
Ron Evan - ‘67 Coupe
-
Concerning these grilles, there are good reviews for the grill assemblies. It is best to buy the grill assembly, rather than buying parts and assembling the grills yourself, because it is not easy to get the parts to fit together correctly.
Grille Hybrid
-
Some ‘69 owners put ‘67 or ‘68 grills on their cars. It's hard to do that, since you would also need the matching nose piece and hood. Not to mention finding a good ‘67 or ‘68 grill set with bezels and hood inserts. But it has definitely been done more than once, judging from the number of "hybrids" one sees in ads.
-
Max Heim - ’67 Fastback
-
-
You gotta change out the header panel to put in ‘68 grilles. Then you gotta change the hood to match the header panel.
-
Painting Grille
Inner Surround
-
All were light argent, non textured.
-
The black ones were not painted, but made from black plastic. Those were for the M code Cudas.
-
Dana Price
-
The inner surround argent silver paint is available at your local Chrysler dealer ($14 a can). This is the same color that is on the bottom of the dash bezel and the trunk trim.
-
Mike Jarvie
-
-
If you want black any semi-Gloss is good used on S cars and Cuda'. Otherwise Argent Silver is still available from Mopar or Totally Auto. The HL trim rings should be argent as well.
-
Use the SEM self etching primer. Let sit warm until dry. About 1 hr to degas and shoot 2 light coats of SEM trim black. Then with panel laying flat, one smooth left to right cover coat. Do not change direction!
-
No clear coat. Do not clear it. You will regret the way it will look.
-
Dana Price - ’68 Conv
-
Outer Grille Stripe ’67-’68
-
Depending on which of the 2 makers of the grills, one painted them on, the other used stripe tape. Quite often the painted ones were not that great at staying in the lines, I've restored some that the black was completely out of the channel! But either works. When I restore grills and bezels, I use tape. 3M 1/4" tape would work. Prep for that is reducer or acetone. Then apply with moderate tension for the straights, light tension for turns. Set with hair dryer on low.
-
Dana Price - ’68 Conv.
Egg Crate
-
Egg crate grille was black for S cars and cuda'. Silver argent for all others. S and ‘Cuda also had the front edge of the egg crate as natural. You can spray black from the backside or do like me and just sand the front edge back down with emery cloth after spraying black.
-
Gerald Drury
-
Use the SEM Trim Black. Let sit warm until dry. Shoot 2 light coats of SEM trim black. Then with panel laying flat, one smooth left to right cover coat. Do not change direction!
-
No clear coat.
-
Dana Price - ’68 Conv
-
-
On the ends of the grate, some bending is normal. If the egg grate is broken in parts, put them in first, then use some UV glue.
Grille Installation
-
Trying to get all the studs inserted in the header panel holes provides a couple of challenges, but nothing too bad. There also isn't much room on the back side of the header panel for tightening the nuts, but it's not an ordeal.
-
Jeff Ramin - ’67 Coupe
Trunk Panel Trim
-
They fasten to the trunk lid. They were not originally textured, just a light argent color. The aluminum trim was "anodized" at the factory. This is a clear coating of aluminum oxide. Eventually, this turns into a dull coating of aluminum oxide.
-
Some tail panels were black, but on formula “S” ONLY.
-
There were a lot more argent panels than “S” panels so the Fish emblem should be easier to find than an Formula S badge. In fact the standard panel should be easier to find.
-
Jim Conner - ’68 Cuda
1967 Trunk Panel Trim
-
Mopar made the uppers and lowers mouldings different from the factory. That difference is small.
1969 Trunk Panel Trim
-
Mopar made the trunk panel all one piece in aluminum.
-
Trunk Panel Trim Restoration Shops
-
There are some shops that will strip the original anodizing and straighten and re-anodize.
-
If your trim is dented and bent to some degree, there are two places that were able to straighten and polish them in So. Cal. But beware that in doing so they will have to remove the anodizing. They came out looking just about like new. Look for a shop that does metal polishing and or anodizing. It won't be cheap but it will be nice again.
-
Mike Jarvie - ’68 Fastback
-
Sihilling Metal Polishing in Santa Ana can re-anodize for you.
-
DIY Repairing Trunk Panel Trim
-
You can strip the anodizing with lye, bump out the dings, polish and clear coat. If your original fish emblem is still ok on your existing panel you can remove it and install on the new repop panel. A bit tedious but doable.
-
With aluminum pieces you have to remove the anodizing on the surface. I use Easy Off oven cleaner sprayed on and left for about 15 minutes then thoroughly rinsed off with water. You will be able to see any anodized patches left that need further treatment if any. Stainless doesn't need this.
-
-
You can repair damaged aluminum or stainless pieces after the anodizing is removed with Easy Off.
-
-
The aluminum trim eventually turns into a dull coating of aluminum oxide. Restorers take it off with lye (oven cleaner) so they can polish the bare aluminum (aluminum oxide is much harder than "pure" aluminum). But if you leave polished aluminum bare, exposure to air will turn the surface into aluminum oxide again (basically, aluminum "rust") -- it will get dull. So yes, most people try to keep it covered with a wax.
-
Leanna ~ The CudaChick
-
-
FWIW: A sanding/polishing progression that has worked fine for me on aluminum and stainless steel trim - AFTER you remove any anodizing with Easy Off oven cleaner - is 320 (for badly scratched/pitted pieces), 400, 600, 800, 1000, buffing wheel with green jewelers rouge, then Mothers Aluminum & Mag Polish on a soft cloth
-
Steve
-
-
That's very close to what I do here too with the exceptions being that after necessary files. I usually start with 220 if it's really rough, and then add in 1500, 2000 and 2500 grits prior to hitting the buffer. I use no Mother's or other liquid polishes ever (per our TrimMaster Dana, who's been instrumental the last couple years in getting me up to speed on trim stuff) -- just buffing compounds tailored to each type of metal. It seems to be working out okay.
-
Leanna ~ The CudaChick
’67 Trunk Trim Restoration
-
They have the anodizing on them that over time goes to crud. I know this will require me to keep them waxed and polished, much like wheels. I did a set of rocker moldings on a car 3 years ago and they still look great. So here is what I did.
-
I took 000 steel wool, then 0000 wool to remove the shitty lookin anodizing and to smooth out any scratches. Then on to 0000 to polish and reduce any slight haze that the 000 wool left. After that I got on the buffer and used level 2 white rouge and hit the buffer. With in seconds the trim looked bright, and near flawless. It takes way less time than what I've been doing and uses by far much less material as rouge is not cheap. Do the entire strip this way and it will turn out great.
Dana Price - ’68 Conv
Trunk Panel Trim Oxidation Prevention
-
There are a couple of ways to keep it from oxidizing. One is to keep it waxed. The other is to clear coat it. In any case, you do have to put something on it to keep it from oxidizing again.
-
JL
-
-
My paint guy sprayed my polished aluminum trim with clear-coat when he was painting the rest of the car. That should stop the trim from re-oxidizing,
-
Darwin
1967 Trunk Panel Trim Color
-
There are several colors for the rear wide trim on a notchback.
-
One is black, the other is chrome, or argent silver. The ‘67 trunk panel had a texture etched into the metal where it was painted Argent.
-
Robin Findlay
-
-
You could order them black with the FS package.
-
Robert Wiffen - ‘67-440 Fastback
-
1968 Trunk Panel Trim Color
-
I want to paint my tail trim panels the factory color. I believe the factory color for the area between the chrome trim is argent silver. I have read Krylon Dull Aluminum can be used for this purpose. ‘68 trunk panels had no texture in the Argent area.
-
-
In the Mopar Collector's Guide they have advertisements for "textured argent in a can!". Totally Auto has the correct light argent used on those panels for the taillight housing extension pieces. Bad thing is $25 a can for two small pieces kinda bites. Herb's Parts appears to also sell paint; but maybe just interior paint.
-
Jim Conner - ’68 Cuda
-
-
Mine were not originally textured, but I textured them. I let them dry for about 3 days or so. I then masked off the textured portion (easy release masking tape recommendation of Rob Robinson) to paint the black stripes. I used satin Rustoleum for that. Some black overspray or wicking got through the tape onto the texture. I wanted to get it off so I used some mineral spirits. The mineral spirits took part of the dull, rough top layer of the Krylon dull aluminum off. What was left was a semi-gloss finish, somewhat darker, and Fantastic! It looks like a factory finish. You might want to try this procedure, it worked for me. I definitely would not recommend rubbing the aluminum finish with anything but the mineral spirits.
-
Jim Conner - ’68 Cuda
-
-
I painted the trunk trim on my ‘68. The original finish had no texture at all. I masked it off, and painted with an old can of Corvette rally wheel paint. I let it dry and painted over it with dull aluminum. It looks great! O'Reilleys carries a Ford silver argent. Dealerships may carry the silver argent.
-
Jim Conner - ’68 Cuda
-
-
The center molding paint is Dupli-Color gray engine primer -- the consensus here (friends, neighbors, UPS lady, and me) was that the primer color looked better than any of the final colors I tried. The darker gray looked good with the dark blue paint. So now I'm looking for a finish paint of the same color. Other colors we looked at were polished, black, Krylon 1403 dull aluminum (argent silver substitute), and rust-oleum 7581 light machine gray.
-
Ron Evans - ‘67 Coupe
1969 Trunk Panel Trim Color
-
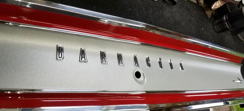
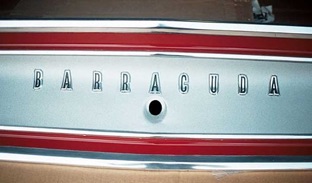
There were two makers of this panel. The top and bottom of the panel have a red stripe. The middle of the panel is painted light argent, with black on the stamped Barracuda lettering.
-
-
-
-
With very careful taping, use international harvester red or old red tractor paint from NAPA. They are the right shade and very durable.
-
Matt Gause
-
Use Rust-Oleum Colonial Red to match the rear tail lights.
-
Steven Young
-
You can paint the “barracuda” lettering black. Look up roll back tape techniques if you don't know how already. It helps greatly on the letters.
-
Dana Price
Trunk Panel Trim (Polished Part)
-
The polished part of the trunk panel, or tail panel, is dull when dry. It looks nice and shiny when wet, with water or mineral spirits. I've cleaned it with Mothers, Blue magic, and polishing compound. I, also used NEVR-DULL. Can you clear coat the polished part of the panel or is there something else to put on to retain the finish?
-
Jim Conner - ’68 Cuda
-
-
It’s because it’s anodized, it’ll look dull when dry. What I did was polish off the anodizing it’s shiny now but more upkeep. I use NEVR-DULL, it’s how I maintain my trim now.
-
Daty Rogers
-
-
NEVR-DULL is the stuff in the blue can, kind of a cotton/cloth material that turns oxidation black on the metal. On my ‘67 the taillight pieces are darker that the center panel, most i've seen are the same. 2 different metals.
-
Robert Wiffen - ‘67-440 Fastback
-
-
The stuff is NEVR-DULL. You can still get it for about 9 bucks on eBay.
-
It seems strange to me that they put an anodized finish that is supposed to match a chrome finish (tailights).
-
-
It’s pot metal and chrome on the lights, on the trim which is why I polished mine. It just looked better, never dull in in a blue can, it’s hard to find.
-
Daty Rogers
Aftermarket Trunk Panel Trim
-
They are reproduced by Metro Parts Company and sold by many others.
-
http://www.buymetroparts.com/item/a-body-barracuda-67-69/1967-barracuda-deck-lid-moldin/lid=10723270
-
-
I've looked for a decent original lower trim piece for years and haven't found one.
-
Layson's makes reproduction panels (welded stainless ones). I had to paint the sliver part back to the original Krylon Dull Aluminum since the paint on them is too dark.
-
Rob Robinson
Trunk Panel Trim Reproduction
-
You can now buy a repop that fits pretty decent but ohhh so thin. You can easily bend it with your grip if you are not careful.
-
-
Classic Industries has both the standard (Argent) and black “S” versions. You have to punch the holes for the the fish or “S” emblem as needed. They look nice, but like I said very thin as compared to an original.
-
-
Metro Parts is a company that made some reproduction parts for a while. I am not sure if they are still in business. On their ‘67 trim, they made the upper and the lower trim the same. They are interchangeable. The problem with that is that Ma Mopar didn't make them that way. That difference will cause the moulding to not line up 100%. They are still a heck of a lot simpler solution than trying to locate (which is a problem in an of itself) and fix (a whole new set of issues) an original set.
-
-
Dana Price (our resident trim-master) did a comparison of them vs original and documented it on the BOG.
-
Jonathan Reck
-
-
The mount holes for the emblem are different between the two panels as well. The repop versions are fully painted, I’m referring to the two small trim pieces that screw to the trunk side of the taillight buckets that have the crescent area painted.
-
Gerald Drury
-
-
-
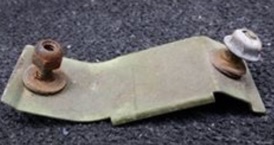
Trunk Panel Trim Moulding Clips
-
I need a set of molding clips for the lower trunk panel. They are the ones with two studs. Several of the studs broke on removal. I would drill out the broken studs and epoxy screws in there, but I had to do that on the front grilles and it is terribly time consuming.
-
Jim Conner - ’68 Cuda
1967 Trunk Trim Clips
-
The ‘67 had 3 trunk moldings.
-
The upper trim piece has 5 "inner clips". But it also has 2 "end clips" . The middle trim has 4 "inner clips".
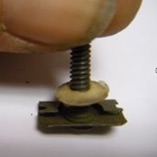
1968 Trunk Trim Clips
-
There are 2 types used. On the end clips you use the normal crown nut seen on the left. All other are like the nut on the right. The crown nut is a 11/32 and the speed nuts are 3/8.
Dana Price -
-
I bought small nylon nuts for mine, work great, never rust!
1969 Trunk Trim Clips
-
This is an original ’69 rear panel clip.
Attaching Trunk Tail Panel Trim
-
There is a fastener that is used. The large fastener is the original. The small fastener is the one that comes with the reproduced trim -- it is not very strong. I have also seen original trim with the smaller size fastener. I used the large rectangular fastener shown in the middle, cut down using Wiss sheet metal shears and then straightened using pliers. It is steel, but isn't very hard. I first tried using screws and washers, but couldn't find a screw head low enough to clear the inside ridge of the molding. Washers would have been a better choice because they are harder. Next time I'm going to try using the large original-type fasteners (they are reproduced).
-
Ron Evans - ‘67 Coupe
-
-
You must align the Tail Panel Trim. Use serrated washer nuts and cranked down pretty hard with a nut driver.
-
Aftermarket Trunk Panel Moulding Clips
-
Try R/T Specialties.
-
If you can't find them on their site, try calling the owner, because he is very knowledgeable about where to get fasteners.
-
Ron Evans - ‘67 Notchbacks
-
-
R/T Specialties has good stock, good prices, and good people. If you don't see anything in their online catalog, give them a call -- they go out of their way to try to find something that will work.
-
Ron Evans - ‘67 Coupe
-
Layson’s wants 100 bucks just for the clips.
-
Classic Industries has a lot of parts for our cars.
-
http://www.classicindustries.com/mopar/a-body-barracuda-1964-69/parts/?q=weatherstrip
-
Rob Robinson
-
Aftermarket 1967 Trunk Panel Moulding Clips
-
You can get new clips for the upper and lower, not the middle. If you have them, clean them up and reuse them.
-
-
You can't find them at Classic industries or eBay. But this company has a large selection:
Trim Rivets
-
When I put the aluminum cover and pot metal ring covers back together should I use standard pop rivets or try and get the original style auto rivets ?
-
-
I used Aluminum rivets on mine, the only two types of rivets I have readily available to me are Aluminum and stainless. I'm afraid the stainless would damage the Aluminum of the grill during the riveting process, the aluminum rivets are much softer and have plenty of strength for the application. I definitely am not worried about electrolysis since the grill pieces are Aluminum anyway.
-
Michael Mosley - ’68 Cuda
-
-
Steel rivets are just going to rust later.
-
-
Use aluminum rivets on my grills, etc. - reason: when I disassembled the grills to replace broken off studs, the steel rivets from the factory were a pita to get out. I had to grind off the heads with a Dremel and went through one grinding stone for each side. Also, isn't there an electrolysis issue (as well as the rust issue like Leanna mentioned) with steel and aluminum?
-
Steve Toth
-
Use a rivets and a tubular rivet setting tool from an industrial distributor called Spaenaur located in Kitchener, On Canada. Rivets are set by hand using a vise as an anvil. No problem. Here is a link to the page.
-
Jacques Bouchard - ‘67 Barracuda Coupe
-
-
The rivets can be purchased here http://www.rivetsonline.com
-
-
A tool I recommend and use to re-install the rivets can purchased here
-
-
That tool is very inexpensive and works well for the grills and ashtrays.
-
Gerald Drury
-
Trunk Seal (Rubber parts)
-
There seems to be various shapes and configurations for the cross-section of these trunk seals. Mine had a simple flat rectangular seal which obviously wasn't right - most of the rust in the car was inside the trunk.
-
Jim Conner - ’68
Trunk Seal (Rubber parts) Installation
-
Install the trunk weather stripping. Information from the email list or Softseal on the proper orientation is limited. It takes a fair amount of time; since there aren't any clips. Hold the weatherstripping in place while the adhesive drys.
Jeff Ramin - ’67 Coupe
Aftermarket Trunk Seal (Rubber parts)
-
There are at least 2 very good companies, Steele Rubber and Metro Softseal, both made in USA. A guy in San Jose CA is a Soft Seal Dealer, the business is called the Goat Farm. He sells GTO stuff, but he beat Year One's prices. He also sells at Pomona Swap Meet, but my stuff he just had drop shipped
-
from Soft Seal.
-
Phil Saran
-
-
The Classic trunk seal is a generic for a, b, and e-body trunks. Trunk seals from Classic Industries are only $18.99 -- Classic lists OER as the vendor.
-
Ron Evans - ‘67 Coupe
-
-
Trunk weatherstrip for a ‘69 FB is also available from:
(1) YearOne #FRTW12 $39.95
(2) The Paddock Inc #CH1004 $16.95 -
It probably comes from the same place Soft Seal or Metro.
Try this source: http://www.weatherstripspecial.com/barracud.html
Weatherstripping Adhesive
-
Our cars use weatherstripping to keep moisture, dust, and debris out of areas on the car. Now most weatherstripping comes with either plastic clips or fits snug into channels to hold the rubber into place. But sometimes you need more. Use 3M Weather Stripping Adhesive to adhere the weatherstripping to your car body.
-
-
A tube of 3M weatherstripping adhesive and a roll of narrow painter’s tape (and some patience) are all you need to get the job done in a couple of hours.
-
-
Weatherstrip adhesive is applied in two-parts:
-
1. Apply a thin bead on a clean surface.
-
2. Do the same to the mating surface of the backside of the weatherstripping.
-
3. 3M recommends to wait up to a minute before bonding the two together. During this time the glue
-
allows for an oxygen-activated “kick.”
-
-
With a gentle cleaner, wipe down any excess glue and residue. The 3M adhesive requires a few hours to fully bond, so closing the hood, trunk, doors, and windows when you’re done helps the glue dry faster.