

General Information
Options Codes
-
Code #A13 440 'Cuda - Options were cosmetic body trim packages added to the already Formula S equipped cars. there is the V78(accent stripe delete) on the fender tag. Likely because the accent stripe could still go on the car without interfering with the 'Cuda striping.
-
-
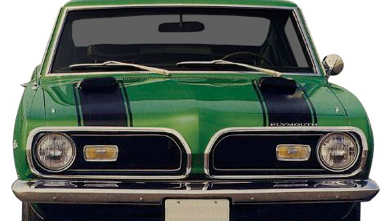
Code #A53 340 'Cuda Formula-S package - Options had the 'grille- black finish', and the rear trunk deck panel black with 'Barracuda' lettered on the center above the key opening, and the Formula-S medallion on the right corner. The chrome exhaust tips were part of that package.
-
A 1969 Barracuda could be ordered with a 340 engine, but not required to have the Formula-S package.
-
-
The 1969 Barracuda 340 that came with the Code #A53 Formula S option had horizontal striping and Front fender 'Barracuda' only emblem.
-
-
Code #A56 340 'Cuda - Options were cosmetic body trim packages like the ''Barracuda 340-S' front fender emblem were added to the already Formula S equipped cars. There is the V78(accent stripe delete) on the fender tag. Likely because the accent stripe could still go on the car without interfering with the 'Cuda striping.
-
-
Code #A57 383 'Cuda - Options were cosmetic body trim packages added to the already Formula S equipped cars. there is the V78(accent stripe delete) on the fender tag. Likely because the accent stripe could still go on the car without interfering with the 'Cuda striping.
-
-
Code #E55 340 'Cuda - Options on this standard Barracuda, also had the 'Barracuda 340-S' emblems on the front fender that had the Code #V78 horizontal stripe delete.
Emblems
-
Emblems were used by Plymouth to indicate special features of the car, (i.e. V8, Special Edition, etc.
-
Emblems are typically not listed by size, # of pegs and their spacing, etc... since they will be identical to the original emblem.
Penstar Emblem
-
The Penstar was created in 1962 and designed to be recognized no matter how it was looked at (even flipped or upside down). The Chrysler Penstar was only on one side, not both. It was on curb side of car (pax side on US cars, driver side on export cars). UK cars had steering wheel on right side hence, the curb side was on the left.
-
Graveyard Cars
-
It was gold in color with black separation lines. Some places sell a silver penstar.
Emblems Location
-
‘69
-
‘68
-
‘67
-
Emblems don’t come with placement instructions. Typically the emblem is placed back into its original mounting location. If you’ve replaced a panel – you’ll need to note where the original emblem was positioned on the old panel and transfer that to the new panel.
-
-
Depending on the year, numeric engine markings (383 or 340) should match what's under the hood. Location varied from year to year. Note: the 340-S emblem really had nothing to do with the Formula-S handling package.
-
-
If you’re adding emblems to a vehicle that didn’t have those emblems on it originally – you’ll need to get the placement information (or make/ get a template) off a vehicle with the emblems in the correct spot.
-
-
'69s had the Barracuda badges in front of the wheel well above the side markers. The black rear trunk-lid deck panel 'appliqué' black with the 'Formula S' medallion on the right side of the panel, only came through with the Formula S package, either with the standard 340 engine or 383 optional engine.
-
'68s didn’t had emblems above the side markers.
-
'67s had the Barracuda badges in front of the wheel well above the side markers in '69. '67 Cuda new from the factory did not have any emblems on the rear fenders.
-
The ‘67 formula S emblem should be on both fenders.
-
-
There were never any emblems on the '67s above the markers on the rear quarter panels. There were no additional FACTORY emblems put in that location.
-
Dave Dalmas - ’67 Cuda
Emblem Removal
-
The front fender fish & script can be easily reached from the wheel well. The the engine emblem behind the wheel that has to be accessed via the door hinge opening.
-
For front fender emblems (Formula S and 383 emblems), the easiest way to remove them is with the fenders off the car. You must remove the front fender splash guards to get to the fender emblem nuts. The mounting posts are plastic, so be careful.
-
-
For the fender emblems, you must access through hood hinge hole. You can have someone with small hands get in there. You can partially open the door and help them with visual guidance if they cannot do it by feel.
-
-
The fender emblems are held on with 3/8" speed nuts. You will need an open end wrench or a small 1/4" socket & ratchet.
Emblems Restoration
-
Pot metal is made to be chromed only one time. If the chrome is in decent shape, save the emblem if you can. Clean by immersing in Muriatic acid in cup. The acid will clean the chrome and make it look brand new.
-
-
Use steel wool / WD-40, so they look good.
-
Jeff Ramin - ’67 Coupe
Repainting Emblems
-
Paint on emblems tell you it did not come that way from the factory.
-
The emblems have shadow paint on them where the recesses are black. Satin black spray the whole thing, then when dry, use paint thinner on a rag to wipe the top off the lettering, revealing the black shadow in the recesses.
-
Graveyard Cars
-
-
A flow pencil works great when painting emblems in between the lines. Note: the "V8/Fish" emblem on the left side may require more work to restore, as it is painted red and black. Put a coat of clear coat on the "V8" emblems. The flat black paint has chrome under it, so the bond isn't very good. Hopefully the clear coat will protect it.
-
Jeff Ramin - ’67 Coupe
Aftermarket Emblems
-
I have seen the application of different type of aftermarket emblems, or other make/model emblems installed. The popular Hot Rod script that you could buy at you local auto parts store is one that comes to mind. http://www.ebay.com/itm/Chrome-Die-cast-Hotrod-Emblem-Chevy- Ford-Dodge-Vintage-Classic-Hot-Rod-/400592543294
-
Rob Robinson - ’68 Fastback
-
-
Replacement emblems are made by Auto Metal Direct which is an authorized Chrysler dealer.
Emblems Nuts / Fasteners
-
Many emblems will come with replacement fasteners. Emblems with pegs can be secured 1 of 2 ways. Typically the peg will have a self- cutting nut. As the nut is screwed onto the peg, it’ll cut the threads into it. This is a secure way to mount the emblem, but reaching the backside of the panel isn’t always an option. When you have a blind area to work with – it’s often easier to use what’s known as a barrel nut. It looks like a wall anchor in that its a tube that snaps into a hole of some size and has another hole in it. This hole must be the same size as the emblems peg. The inner hole has barbs which will grip the emblems peg and not let it release easily. The only downside of this attaching method is the emblem can be removed quickly (i.e. stolen) with a putty knife or screw driver.
-
These flange nuts come with the sealer gasket in them, like for the hood inserts and the individual letters on the front.
-
Stephen ‘Catfish’ Parker
-
-
Classic industries is one source for the so called emblem nuts/fasteners or trim nuts/fasteners. My local Ace Hardware used to have them loose in a small bin in various sizes but they recently dropped them when they went to more commonly used hardware items, so you might try a local Ace if you have one around.
-
Steve Toth
-
-
Here's a source for the nuts. I haven't measured mine, but I'm pretty sure they are 8-32.
-
Ron Evans
-
-
YearOne has it....part# CM-8.
-
Lettering Originally the name “Plymouth” was in large letters across the header panel on the front just below the hood on ‘67 models and ‘68 did not. Other years "Plymouth” was a small script on the right side in the front.
-
-
The letters are about the smallest individual letters Mopar ever made. They are probably too small — that’s why they’re so fragile.
-
Max Heim - ‘67 Fastback, ‘67 Convert.
-
-
Emblems Installation
-
The assembly manual typically indicates how to drill the holes... not specifically where on the car the holes are drilled.
-
-
Chrysler used several methods to secure emblems. Pegs through drilled holes, and adhesive backed emblems. Pegs/holes are typical. The problem with this attaching method is it’s an invitation to have a car rust.
-
-
Double-sided sticky tape or spray adhesive is a common way to reattach emblems where you don’t want to drill holes in your car. This may require cutting the pegs off the emblem to allow you to secure
-
the emblem. Use tape to line up emblems and lettering. Mark on tape measurements and location marks. Put on car, then put on lettering.
-
Graveyard Cars
-
-
Put on emblems before interior.
-
Emblems should go back where they were put on by factory, not what the specs say. To be sure use photos of location before disassembly.
-
Mount emblem with barrel clip, they don't reproduce them. Replace missing ones with metal clip.
-
Install the fender emblems before the fender splash shields are installed. Once you install the splash shields, you won't have access to the back side of the fenders.
-
Put in all letters. Then tighten down so they are all level.
-
Wipe down and waxed the areas where the emblems will be. Use Zaino Bros Z1/Z2. Next install the emblems. The "Barracuda" script and the pentastar emblem go on the right front fender. The "V8/Fish" emblem is on the left side. Installation may require a little Dremel tool work. Get the nut started on the emblems and snug them down with a ratchet. Remember be careful as the mounting post is plastic. Use some strip caulk to seal everything up nice and tight.
-
Jeff Ramin - ’67 Coupe
Lettering Removal
-
The advice given is to remove the header nose panel and work from the back to cut off the studs and glue new studs on for reinstall. The header panel actually comes off quite easily with hand tools. A moto-tool or something similar with a small cutting wheel worked the best of me.
-
Rob Robinson - ’68 FB
-
-
After you pull the nose panel, grab the end of the stud with vise grips while turning the nut with a wrench. That is really your only chance.
-
Max Heim - ‘67 Fastback, ‘67 Convert.
-
-
Grab the ends with vise grips, loosen the nuts, grind off.
Lettering Installation
-
Order aftermarket speed nuts as the new ones are crap. They stripped out instead of biting into the studs properly. I used replacement screws designed for attaching kitchen cabinet knobs. They usually have a very flat, wide head that fits back into the grille surround well. I use J-B Weld epoxy that I mix with fiberglass. I just pull a small amount of fiberglass from residential wall insulation. I clip the fiberglass into short strands and mix it with the epoxy. Doesn't take much. That holds better than anything else I have ever used! Be sure to get your studs straight!
-
Jim Conner
-
-
Another option is to use nylon nuts. Also good fro the grille.
Aftermarket Lettering
-
There are several sets of “P L Y” etc. letters with slightly different styling and size. The studs are very fragile. One had the black inlays in the letters, and the other set was more solid letters. They are pot metal, and those stamped steel nuts cut right into them, causing stress cracks. The ‘67 Barracuda nose ones are shared with any other model.
-
Used sets of letters with studs intact for $40 can be found on eBay.
-
-
Classic Industries sells them for $90 a set. The studs are much larger though.
-
"Reproduction of the individual letters for the "PLYMOUTH" emblem located on the hood or the trunk of 1966-71 PLYMOUTH models. (RM4124 - 1966-71 "Plymouth" Hood / Trunk Letters). Each letter is a die-cast replication of the original including a chrome border and black painted lettering.
-
One set includes 8 individual letters spelling "PLYMOUTH". 2 sets required for hood and trunk. Comes complete with a full set of speed nuts for installation. Also includes correct markings on the back of each emblem when required."
-
-
They are not correct for a ‘67 Barracuda, despite what they say. A picture shows a black fill inside a bold letter. They have a black inset when the original letters don't. The 1967 Barracuda letters are slimmer and plain chrome, with no black insert.
-
Ed
-
-
Layson’s Restorations have the PLYMOUTH letter set. They are all chrome letters with no black paint. They sell for about $100 a set for repo's. If you are going to buy from Layson's, make sure you deal with Rick at FABO. His handle there is Rick@Laysons . He has great reputation.
-
Note: Don’t buy anything from Layson’s unless it is in hand ready to ship... they are always planning on making a run or having a part out soon. They used to have stuff in the catalog they had yet to make but would take orders.
-
Michael Mosley
Accent Pin Stripes Codes
-
#V6_ Sport Stripe - the 340-s or 383-s emblem wasn't put on the fenders, nor was the fish emblem. You got JUST the "Barracuda" script emblem. When you ordered the Formula-S sport stripe V6_ , the accent stripe V7_ was automatically deleted, with no V78 on the fender tag. The stripes would go over the top of each other.
-
-
#V6 Sport Stripe (RED) - NO fish or 383-S emblems on the fenders.
-
#V7 Accent Stripe - The V7 means there was an accent stripe added to the full length side of the car.
-
#V78 (delete stripe) - V78 means the stripe was deleted. You could order the 69' 340 with a Formula S package with the horizontal striping, but mark off the Code #V78 (delete stripe).
-
On my fender tag there is the number "V78". My dad's car was blue and came with a black stripe added by the dealership.
-
Angel Garrido - '69 FB
-
Transverse Stripes Codes
-
Transverse Stripe is the term for rear quarter panel stripe tape. It goes around the back of the car around left rear fender, trunk lid, right rear fender
Decals
-
Decals were put on various places on our cars, by Plymouth, to call out a warning, instruction or use. They were put on without regard for neatness and they were non to precise with them anyhow!
-
Note: Some stickers are year specific.
References
-
There isn’t a comprehensive reference for these details on our cars. One book (Challenger & Barracuda Restoration Guide, Paul Herd, MBI Publishing) shows at least some of these items. But my experience with this book is that it while it may be accurate for E-body Barracudas, it is not to be trusted for A-body Barracudas — it has a lot of good info mixed with some bad info and some omissions. It does shows the contents of the jack instruction sticker and tire sticker, for instance, but it doesn’t illustrate the placement. Your best bet is to find an original unrestored car at a show and take lots of pictures.
-
Max Heim - ’67 Fastback, ’67 Conv.
-
-
Your best quality decals have the Mopar Authentic Restoration Product label. Don’t buy anywhere else.
-
-

-
-
Made here in the USA by Dale’s Cuda Shop Licensed OEM Manufacturer since 1981.
Decals Removal
-
First, take pictures of all labels and decals before removal. Take notes, dimensions and photos of your car with the decal or stripes in question in the correct location. Not all kits come with EXACT decal placement instructions.
-
-
To remove an adhesive emblem or decal – use YearOne part #3M8908. Spray this goop on the decal in question and peel it off the car.
-
Rob Robinson - ’68 Fastback
-
Aftermarket Decals Suppliers
-
There are some out there that are WAY OFF. So buy the best from reputable companies.
-
-
Here is a partial list of ‘Cuda Decals:
-
-
Try decals reproduced by Performance Car Graphics. These are the ones you want:
-
http://www.performancecargraphics.com The small ones are correct and the trunk one is what you want. Don’t order it from anyone else, it won’t be right.
-
Rob Robinson - ’68 Fastback
-
-
Try decals reproduced by ECS Automotive Concepts.
-
-
Dale's Cuda Shop
-
YearOne
-
-
-
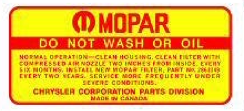
Air Cleaner Instructions Decals
-
(All 1962-1973-and-later Chrysler, Dodge, Plymouth)

-
Air filter instruction decals are also known as "Do Not Wash or Oil" decals. They are sold by the part # of the air filter element, which is written in the decal's text.
-
-
Older decals also show the air cleaner housing part # in the upper right corner. These housing part #s do not always correspond to part #s found in a catalog.
-
-
Unsilenced air cleaner housings have no "snorkel," or air intake tube(s) to reduce noise.
-
Silenced housings have one or two snorkels.
-
-
Some engines before 1969 were available with a permanent, washable "wrap" around a replaceable paper filter. No instructional decals are available for these filters, which always have unique part #s.
-
-
Red print on matte yellow (except as noted), correctly pre-cut contours, with rounded corners, as original.
-
-
● 2658851 / 2658856 66-67: Filter: 2¾" x 18" Decal: 215/16" x 15/16"
-
1966-67 426 Hemi without fresh carb air. Large, round chrome housing.
-
-
● 2536497 / 1739547: Decal: 3¼" x 1⅝"
-
1967 is the only confirmed use. Printed on clear vinyl, as original.
-
-
● 2402677: Filter: 3½" x 12¾" Decal: 3" x 1⅜"
-
1967 383 and 440, ALL cars.
-
1967-71 California Noise Package Big Block cars.
-
1968-71 Big Block silenced (lower performance).
-
-
● 1739547: Filter: 2¾" x 10" Decal: 2¾" x 1⅜"
-
1967-69 273-2;
-
1967-71 318.
-
-
● 2206376: Filter: 3" x 8¼" x 8" Decal: 2⅞" x 1⅜"
-
1967-71, possibly also earlier. 170 and 225 6-cylinder engines.
-
-
● 2658851 / 2658856 68-69: Decal: 3¼" x 1⅝"
-
1968-69 426 Hemi without fresh carb air. Large, round chrome housing. Printed on clear vinyl, as original. This item will soon be available.
-
-
● 2946186: Decal: 3" x 1⅜"
-
1969-71 oval filter, all engines. There are two versions of this decal: The one with the part # in the lower left of the decal is OEM, and was found on new cars; the one with the part # on the right side of the decal is the dealer replacement. Ours is the OEM version.
-
-
● Special Instructions 69: Decal: 4" x 1⅝"
-
1969 440-6: No part #.
-
-
Red/Yellow: $7.00 ea.
-
Year 1967 - 1969
-
-

-
-
Had to glue it on to air cleaner because it kept flying off first I fired it up after restoration. The crinkle finish does not allow it to stick well!
"Airtemp" Chrysler A/C Window Decal
-
(1964 to late-1970s Chrysler, Dodge, Plymouth)

-
Black and silver reverse print on clear vinyl, with correct fonts and all details. Pre-cut around contour, with correct rounded corners.
-
-
Applications are as follows:
-
● 2-door A-B-E-body: Decal is located on passenger quarter window toward rear lower corner. Occasionally found originally toward lower front of glass, and will always be there if the car originally had Scat Pack 1970 factory bee decals.
-
-
● 4-door A-B-E-body: Decal is located on passenger door fixed window, lower.
-
$7.00 ea.
-
-

-
-
The photo shows an original decal. Inside-window decal. One decal used per car.
-
Anti-Freeze Decals
-
(All Chrysler, Dodge, Plymouth)

-
● Mopar: 1964 through late December 1968 production. Decal is located on driver side of radiator yoke top. If yoke is too narrow, place decal on grille support bracket. Black and red print on matte yellow vinyl.
-
-
● Chrysler: Very late December 1968 through 1973 production. Used beyond these years on trucks. Correct "-20º F" printing. Decal is located on driver side of radiator yoke top. If yoke is too narrow, place decal on grille support bracket. Black and red print on matte yellow vinyl.
-
-
● Warm Climate: Pre-1969 models shipped to U.S. Southeast or Southwest. Mopar anti-freeze yellow decal was also used on these cars. Decal is located on passenger side or center of radiator yoke top. Black print on matte yellow vinyl.
-
Two versions available: Early: caps/lower case; Later: all caps.
-
-
Yellow Decals: $7.00 ea.
-
Decal
-
Simple Mopar
-
Mopar
-
Chrysler
-
Warm Climate: Early
-
Warm Climate: Later
-
Red/Blue/White Decal: $9.00 ea.
-
Locations
-
-

-
-
I shifted the antifreeze a tad so the serial number stamp was not covered.
-
Gerald Drury
-
-
I can provide photos of correct placement if you want.
-
Rob Robinson - ’68 Fastback
-
-
-
Battery Booster Instructions Caution
-
(All 1968-and-earlier Chrysler, Dodge, Plymouth)

-
Decal is located on driver side of radiator yoke top, in front of battery. Correct typefaces. Black (and red) print on matte yellow vinyl.
-
● Top left decal shown is confirmed for 1963 Max Wedge.
-
● Bottom left decal shown is found on some 1968-1969 cars.
-
● Research of decal applications is incomplete at this time.
-
$7.00 ea.
-
Decal
-
A (no red)
-
B (small thick red)
-
C (skinny black type)
-
D (large spaced red)
Convertible Rear Glass Decal
-
(1968-and-later Chrysler, Dodge, Plymouth)

-
Used on some 1968-and-later convertible top cars with a glass rear window. Decal is located on windshield inner trim, centered over steering wheel. Black and red print on matte white vinyl.
-
Part # 2879900.
-
ECS Decals $7.00 ea.
-
There is a warning sticker about putting the top down. This sun visor warning changes per year.
-
Barry - ’68 Conv.
Convertible Top Pump Fluid
-
(All 1960s-1970s Chrysler, Dodge, Plymouth convertibles)
-
-

-
-
Apply decal to hydraulic pump so it is readable from driver's side of car. Red print on white vinyl. Use one decal per car.
-
$5.00 ea.
Door VIN Label Decal
-
Door Vin Label. Reproduced by ECS
Engine Callout Decal
340, 360, ...
Emissions Instructions Decal
-
(All 1966-1974 Chrysler, Dodge, Plymouth)


Decal for 1968 V8 Decal for 1969 V8 318ci
-
The emission decal tells you what idle and air/fuel mixture is (under hood). It was located on the fender panel passenger side.
-
The ‘67 did not have an emissions sticker.
-
Label idle 2899842 emission = 42 emissions decal
-
42 emissions decal: for
-
1968 318 Manual Transmission
-
1969 440-6 Automatic Transmission
-
1968-69 383-4 Automatic Transmission
-
1968-69 440-4 Automatic Transmission
-
-
Verified application data for Mopar vehicles. Printed on high-quality vinyl with sharp lettering. Correctly pre-cut contours. Correct colors, and clear-coated (unless noted otherwise) just like the originals.
-
-
Emissions decals were always assigned by engine, transmission, time of year built, and standard or California emissions system. Body type was never a factor. There are many emissions decals for each engine for 1972-and-later cars. There is always at least one difference in each one, and usually several differences.
-
-
Check your car's build sheet or fender tag for build date of car. Check your build sheet for last two digits of emissions decal
-
M = Manual; A = Automatic; CAP = Cleaner Air Package
-
-
1966-67
-
No # (enter 0000000 for part #) California cars with Cleaner Air Package.
-
Applied to air cleaner housing. Correct, without clear-coat.
-
-
1968
-
1969
-
1972 (large green and white)
-
170-A 2899846
-
318-A 3698733
-
225-A 2899844
-
340-4-A 3698708
-
225-M 2899845
-
340-4-M 3698707
-
318-A 2899844
-
400-4-A 3698717
-
318-M 2899845
-
400-4-M 3698716
-
340-A 2951808
-
440-4-A 3698721
-
340-M 2899846
-
440-4-M 3698720
-
383-2-A 2899841
-
-
383-2-M 2899845
-
1973 (long green and white)
-
383-4-A 2899842
-
318-A 3751311
-
383-4-M 2899845
-
340-4-A 3751313
-
340-4-M 3751312
-
440-4-A (350) 2899841
-
440-4-A 3751319
-
440-4-A hp 2899842
-
440-4-M 2899845
-
-
1966-72 Decals: $7.00 ea.
-
Year
-
1966-67
-
1968
-
1969
-
-
Transmission
-
Automatic
-
Manual
-
-
The emission decal tells you what idle and air/fuel mixture is (under hood).
-
-
The ‘67 did not have an emissions sticker.
-
YearOne has the emissions decal.
-
-
It was located on the driver side fender.
-
-

-
-
Jack Instructions Diagrams Decals
-
(All 1960-1974-and-later Chrysler, Dodge, Plymouth)

-
The decals for jacking instructions appear to be different from early ‘68 to late ‘68. There is also a small decal on the jack base.
-
Jacking placement will be different. Some jack sticker were just slapped on the drivers side. On notchbacks, jacking instructions are on the left side inside trunk lid. There is a whole lot more room for that decal than on the fastbacks.
-
-
YearOne has the jack decal. Jacking decals can also be found on eBay.
-
Jacking instructions are different between ‘67 and ‘68. The decals for jacking instructions appear to be different from early ‘68 to late ’68 too. There is also a small decal on the jack base. Jacking placement will be different. Some jack sticker were just slapped on the drivers side. On notchbacks and fastbacks, jacking instructions are on the left side inside trunk lid. It was in the second from the middle section of the trunk lid. There is a whole lot more room for that decal than on the fastbacks.
-
-
All pre-1965 jack instructions are printed on high-quality heavy white cardstock, as original. They were applied with yellow weather strip adhesive brushed on the back of the cardstock, then stuck to the deck lid or compartment cover (some were cardboard tire and bumper jack compartment covers.) 1965-and-later jack instructions are self-adhesive paper, as original, with the following exceptions: 2962995-70 Barracuda-Challenger decal, and 3738514 truck decal are printed on high-quality, heat and moisture-resistant, no-wrinkle, matte white vinyl that looks just like paper. All decals have sharp lettering, correct colors, fonts and drawings, just like the originals. Correctly pre-cut contours.
-
-
Jack instructions decal applications are always determined by body type.
-
Aftermarket Jack Instructions Decals
-
● 2461138-F 1967 Full-size Dodge & Chrysler
-
● 2533529 1967 Valiant, Dart, Barracuda
-
● 2856100-68 1968 Valiant, Dart, Barracuda (small red letters, "bolts" instead of "nuts.")
-
● 2856100-69 1969 Valiant, Dart, Barracuda (large red letters, "nuts" instead of "bolts."
-
-
(Available only in heat/moisture/fume-resistant matte white vinyl that looks just like paper.)
-
Adhesive Paper: $7.00 ea. Part #
-
Adhesive Vinyl: $9.00 ea.
-
Part # 2962995-70 3738514
-
-

-
ECS
Jack Base Plate Caution Decal
-
(All Chrysler, Dodge, Plymouth)


-
Correct black and red print on white adhesive vinyl that looks like the original adhesive paper, but lasts like vinyl.
-
-
● Jack Base Plate Caution (rectangular): Found on almost any Chrysler-made car from at least mid-1960s through mid-1970s, but unlikely to be found on 1968-70 Charger, and not found on 1970 Barracuda or Challenger. Decal is usually found on a jack with a hollow-tube post, and is usually used on jacks with a black-painted base plate and hook, but can be found on light gray-painted jacks. On Daytona and Superbird, the decal is found on the side arm or base plate of the scissors jack. Rectangular, with correctly pre-cut rounded corners.
-
-
● Jack Base Plate Caution (triangular): Usually found on 1968-1970 Charger and 1970-only Barracuda and Challenger. Jack usually has a solid "tee" post, and usually has a light gray-painted base plate and hook-cradle. Triangular, as original, with correctly pre-cut contour.
-
-
● Jack Base Plate Caution (yellow): (Out of stock)
-
$7.00 ea.
-
-

-
Decal used mid-‘60s to ‘70s
-
Decal is located on the flat area of the top of the base plate, and is readable from the front of the jack. The decal is not visible when the jack is stored with the spare tire in the trunk.
-
-
Buy Jacking Instruction under deck lid Vinyl decal: PN 2856100.
-
YearOne has the jack decal. Jacking decals can also be found on eBay.
"Sure-Grip" Jacking Instructions Decal
-
(1963-1967 Chrysler, Dodge, Plymouth super stock cars)
-

-
-
Decal is located on inside of glove box door. No confirmation that these decals were ever used on any cars except super stock. Red print on white vinyl, with sharp lettering. Part # 2750652.
-
$7.00 ea.
-
“Public Law” Sticker - Chrysler Corp.
-
(1968-1969 Chrysler, Dodge, Plymouth)
-
-

-
-
● "Public Law" (early): For all 1968 very early models (August 01, 1967 to approximately January, 1968). Has Chrysler name and pentastar.
-
-
● "Public Law" (later): Part # 2895255. Used from January 1968 through approximately July 15, 1969. Not used on 1970 model year cars. A coined-in arrow may be stamped in the metal, for proper location on A-post. Part # does not appear on decal.
-
$9.00 ea.
Aftermarket “Public Law” Sticker - Chrysler Corp.
-
http://www.performancecargraphics.com/Small_Decals/Export/Public_Law.htm
-
Door post decal- http://robs68barracuda.com/amp3.jpg
-
-

ECS CSD10 1968-1969 All Vehicles $9.00
-
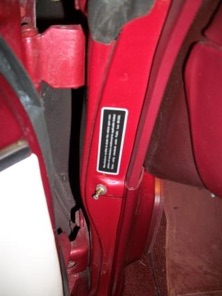
Public Law decals are located in the drivers door jambs (A pillar) area above the door jam light switch. They are readable from inside the car. Correct black typefaces on silver vinyl, and correct clear overlay. Pre-cut contour with correct rounded corners.
Tire Pressure Instructions Decals
-
(All 1966-1980 Chrysler, Dodge, Plymouth)

-
Decals are printed on high-quality vinyl with sharp lettering. Correctly pre-cut contours. Check your car's build sheet code for the correct number.
-
-
1968 cars have any one of three different tire pressure decals, depending on engine, assembly plant, and scheduled production date.
-
-
For all 1968-and-later vehicles, decal shows minimum tire size for body-engine-option combination.
-
Pilot cars for any year may use any decal for any car for that year of production.
-
-
The decals for tire pressure appear to be different from early ‘68 to late ’68.
Tire pressure in the back. -
-
1966-69 Barracuda fastback
-
1967-69 hardtop and convertible
-
● VL VL (red)
-
-
1967 Dart & Barracuda (except fastback)
-
● RW RW (lime)
-
-
1968 Barracuda early
-
● 2948064
-
-
1969 A-body, 340, D70-14
-
● 3400485
-
-
1969 A-body, 340, 383, 440, E70-14
-
● 3400477
Aftermarket Tire Pressure Instructions Decals
-
Color Decals: $9.00 ea.
-
Year 1967 1968
-
-
Part #
-
BX-29 (teal)
-
BX-29 (yellow)
-
No # (blue)
-
RW-W29 (blue)
-
-
Black & White Decals: $7.00 ea.
ECS
-
-


-
Decal for 1969 E70x14 tires
-
-
The tire pressure decal is on that flat area at the striker (driver's door jamb) 2” below door striker pin.
-
Rob Robinson - ’68 Fastback
Tune-up Sticker
-
Tune-up sticker on either side but mostly on the driver side (mine is a 340 sticker).
-
Rob Robinson - ’68 Fastback
Hood and Trunk Lid Stripes Decals
Hood and Trunk Lid Stripes Decal Installation
-
Installing the stripe on the hood or trunk lid is a 2 person job. Try to get it nice and flat with no air bubbles.
-
Rear Tail Light Panel Stripe
-
(1968 Plymouth Barracuda)

Decals are precision-cut to be exactly like the original, using the highest quality vinyl.
-
Original color for these tail light panel stripes is Maroon Reflective. We also offer this stripe in custom Ruby Red Reflective, for those who prefer red-red, instead of burgundy.
-
● Includes detailed instructions and application squeegee.
-
Reflective: $49.00 ea.
-
Color:
-
Maroon Reflective
-
Ruby Red Reflective
-
-
Cards
"Engine Starting" Instructions Card
-
(All 1969-1970 Chrysler, Dodge, Plymouth)

-
The card hangs on the steering wheel turn signal stalk. Correct typestyles and all details. Green print on white, with pre-cut hole and contour.
-
Part # 2946788.
-
$7.00 ea.
Radiator Card

Seat Belt Caution Sleeve
-
(All Mid-1960s Chrysler, Dodge, Plymouth)

-
Wraps around seat belt, stapled in loop. Correct typestyles. Black print on white card stock, as original. Use one sleeve per seat belt.
-
$5.00 ea.
Warranty Maintenance Card

The Warranty Maintenance Card was riveted to the inside of the glove box on ’67 models.

-
-
Warranty Story Maintenance Card
-
-

Tags
-
The following tags, transfers, stickers are available from ECS Automotive Decals.
-
-
-
Alternator Inspection Sticker
-
1968-1971 All Vehicles - Note: 4 different inspector code numbers are available.

-
-
This decal is located on the bottom part of the alternator housing near the part number and date code stampings.
COIL DRY TRANSFERS
-
-
CDT10 $25.00

-
1969-1971 All Chrysler Vehicles
-
-
Dates Available:
-
29th Week of 1968
-
12th Week of 1969
-
28th Week of 1969
-
46th Week of 1969
-
-
These dry transfers are exact reproductions of the original green stamping that were found on Chrysler ignition coils. The available dates cover early 1969 to late 1971 vehicles. The selected date should proceed the scheduled production date by 8-12 weeks. This item allows the enthusiast to have an original looking coil without the difficulty of having the hand stamp their restored unit.
-
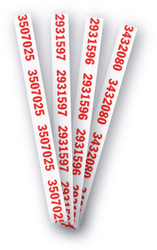
DANA AXLE IDENTIFICATION DECALS
-
CDX11 $10.00
-
1969 3.54 Ratio Gears w/10 Inch Power Brakes
-
(Chrysler #2931597)
-
-
CDX10 $10.00
-
1969 3.54 Ratio Gears w/11 Inch Power Brakes or Manual Drum
-
(Chrysler #2931596)
-
-
CDX12 $10.00
-
1969 4.10 Ratio Gears w/Power Brakes
-
(Chrysler #2931644)
-
-
CDX13 $10.00
-
1969 440 Six pack, Lift Off Hood/Special Production Vehicles, 4.10 Manual
-
or Power Drum
-
(Chrysler #3432108)
-
-
-
-
This decal is located on the axle housing tube of Dana equipped cars. It is positioned on the drivers side, inside of the leaf spring U-bolts and wraps around the axle tube.
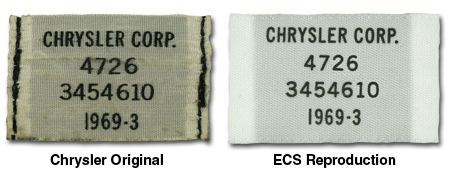
ENGINE COMPARTMENT WIRING HARNESS TAG

CEC41 1968 A Body Barracuda Formula S w/383 CID Engines $8.00
CEC40 1968 A Body Barracuda w/318 & 340 CID Engines $8.00
CEC44 1969 A Body Barracuda w/318 & 340 CID Engines $8.00
CEC43 1969 A Body Valiant & Barracuda w/383 CID Engines $8.00
-
-
-
Wiring harness exits the middle firewall area and is routed along the passenger side of the engine. It is positioned between the intake manifold and valve cover area. Various engines will differ in their exact locations. All tags (except Hemi) are located approximately 3 inches down from the bulkhead connector where the tape wrap starts.
MAIN INSTRUMENT PANEL WIRING HARNESS TAG
CIP2 1968 A Body Barracuda (All) $8.00
CIP28 1969 A Body Barracuda (All) $8.00
-
Wiring harness is routed from the fuse box and continues behind the dash pad of the vehicle. The tag is located in various positions along the harness. It could be found about 2 to 3 inches down the harness where it exits the fuse box. It was also located behind the dash pad along the harness, or behind the passenger side kick panel at the end of the harness sheathing/wrap.
MAIN TAIL LIGHT WIRING HARNESS TAG

CTL25 1968 Barracuda 2 Door Hardtop $8.00
CTL27 1968 Barracuda Convertible $8.00
CTL26 1968 Barracuda Special 2 Door Hardtop $8.00
CTL31 1969 Barracuda 2 Door Hardtop $8.00
CTL33 1969 Barracuda Convertible $8.00
CTL32 1969 Barracuda Special 2 Door Hardtop $8.00
-
-
-
Wiring harness is routed inside the trunk, over the driver side wheel housing, along the rear tail light panel and ends on the passenger side of the vehicle. The tag is located approximately 1 inch from the end of the harness sheathing near the passenger side tail light.
-
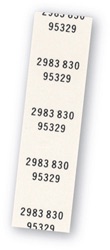
SEAT BELT PART NUMBER / DATE LABELS
-
These labels were attached on all seat belts manufactured for the Chrysler Corporation. Their location depended on seatbelt applications and usage.
VIN PLATE TRANSFER

CCT10R $29.00 pr.
-
1968-1974 All vehicles - NOS rivets!
-
-
CCT10 $24.00
-
1968-1974 All Vehicles that used the Light Gray Chrysler Corporation Stamping on the Dash VIN Plate
-
-
CCT10S $53.00 set
-
1968-1974 Transfer and Rivet Set — Light Gray Dry transfer w/two NOS rivets!
-
-
-
-
-
-
This latex ink dry transfer is a perfect reproduction of the original used by Chrysler. They are basically a “portable” stamping and do not require baking or other difficult application procedures. Transfer time takes about 15 seconds! Complete instructions included.
-
CUSTOM CAR METAL KEY TAGS
CMT10-P $20.00
-
All years with Model and Production Year on a Miniature VIN Sticker (Plymouth)
-
-
CMT11-P $32.00
-
All years with Specific Date and Actual VIN Number Printed on VIN Sticker (Plymouth)
-
-
-
-
-
-
-
-
These stainless steel gems are custom ordered to exact vehicle specifications. Two versions are available. These stainless plates incorporate a miniature VIN decal on the front, accompanied by a Chrysler Plymouth/Dodge logo stamped on the back. The first version uses the model and year for its custom print. For those who really want to personalize their key tag, we provide a miniature VIN that has the exact build date and VIN number of the vehicle. This is a really unique and personalize way to keep your prize possession separate from your daily drivers!
-
Wiper Motor ID Number Decal
-
Available from Performance Graphics. $5.00 ea.
-
(Late 1969-1971 Chrysler, Plymouth and Dodge)


-
-
Part #
-
2983116 1969-1971 A-body with variable speed motor
-
3431077 late 1969-1970 B-body with 3-speed motor
-
Printed on the highest-quality heat-resistant 3M matte blue or yellow vinyl with the correct font and correctly-rounded corners.
Final Inspection Marks
-
Final inspector views them at end of assembly line. They were put on to show the car parts were done: (I.e. Transmission bolted down, fluids are filled, shift rod adjusted.) Alpha numeric codes correspond to color markings.
-
-
Examples of Inspection Marks:
-
Yellow - Bolts on tranny 3 Yellow numbers on axle assembly.
-
Blue - Single dot on torsion bars.
Detailing
Prep
-
To prep the finish like the pros follow these instructions:
-
1. First determine how dirty the vehicle is. If it is simply dust from driving then air blowing it down will work to remove 80% of the dust on the surface. A small pancake compressor that plugs in to a 110 volt
-
outlet will do the job just fine. Use an air blower with a rubber tip so you will not scratch the surface if you bump it. Detail a car in a garage or under a carport and never in the direct sun or outside wind which will tend to blow dust back on to the surface as you work.
-
Avoid wax buildup in and around door edges, emblems, moldings with that whitish chalky look that reveals a car or truck has been quick polished.
-
2. Purchase tack cloths. This surgical blue cloth is very tacky yet it does not leave a sticky residue when used properly like some brands do.
-
3. Unfold the tack cloth so it is puffy and about 1/2 think covering just out side your hands surface. While lightly wiping the cars finish this will pick up 100 percent of the remaining dust particles. These cloths are designed for Pre-paint cleaning.
-
4. " DO NOT " push down, use just the weight of the tack cloth or you will leave a residue. Simply drag it back and forth and let the cloth do the work. No pressure, just let it glide. 2- 4 strokes as long and straight as you can then folding the tack cloth to a new clean side. Repeat until the whole vehicle is wiped.
-
5. Dupont has E-4144 Sontera polishing cloths that are disposable. These will not scratch a painted surface but allow water wiping, polish application and removal just right.
-
6. If dirt is left on the surface too many hours then there will probably be some dirt residues so the next step is to wet down some Sontera towels. Fold 3-4 towels together the same as we discussed with the tack rag and dampen well.
-
7. Be sure and squeeze excess water from the towels so it is as wet as can be without dripping.
-
8. It should not drip once you squeeze it out other wise you will be leaving water streaks and spots on the finish.
-
9. The same method is used as the tack rag, long strokes but turn the rag more often to a clean side. Remember that taking your car to a car wash and or using a wash bucket like an every day driver will scratch the finish. This will be undetectable outside and in high light but in low light you will see the hairline scratches that the soap and water bucket method offers.
-
10. The rag will pick up the dirt easily because of the amount of moisture on the towel.
-
11. You have to turn the towels to a clean area on a regular basis until your project is completely done. This could mean 3-6 individual towels if need be.
-
12. A 1/2 thick like the tack rag is perfect, continue to wipe and turn to a clean side until the rag is not picking up any more dirt. Never rinse them out in water and reuse the same towels as this will scratch the surface.
-
13. Once the car is completely cleaned the next step is to mask off all the emblems, moldings and body gaps to keep wax and or polish from entering in and being stuck down in to the crevices, making it hard to remove.
-
14. Simply lay it on with your left hand/fingers pushing in to place while the right hand is guiding it. Reverse that if you are left handed.
-
15. 3M 05990 hand Glaze is not a wax and it will only look really good for couple of days. The finish it leaves is superior to that of a wax job but it is used for show work only. The following application methods will be the same for the wax of your choice. In the refinishing business we use this product because it has no silicone like wax which can contaminate a paint shop with fish eye problems. Keep in mind that although it does not last as long the excess of this product is wiped off much easier then wax is.
-
16. Another product you can use that gives excellent results is Meguiars final inspection. This should be applied the very same way as the glaze. The excess wipes away very easily.
-
17. It is a good idea to keep all the supplies we have shown ready to go in your garage and or in the trunk of your ride for detailing. Water in a Gatorade bottle is leak proof and ready for action on the road to clean up bird droppings and bugs smashed against your grille, windshield etc. Wax and grease remover Dupont 3919S removes tar, oil drippings and wax build up on painted surfaces before detailing. Label them for easy access.
-
18. Small amounts are squeezed on to the Sontera towels the size of a 50 cent piece is fine. If using the Final Inspection, spray it on the towel until a liberal amount the same size has been achieved.
-
19. In a circular motion apply the glaze with minimal pressure, when you witness this you can see how easily the molding to the right will get buildup in the cracks compared to the taped areas.
-
20. You simply take another set of folded dry towels and wipe until the residue is gone. You will see a beautiful reflection in the paint.
-
21. If you have stubborn scratches or any stains 3M's " Finesse It " part # 5929 will remove them. It takes longer by hand using this material but if you are not use to power buffing then only use it by hand. It is the same application rate as all the other methods.
-
22. It will also buff out the finish nice but will need to be glazed to finish it off.23. On to the tires we use Forever Black. This product blackens the tires " dyes" them so they look brand new but it does not leave them shiny or fake looking like some products do. Be careful around white walls, red lines etc.
-
24. The tires need cleaning before applying the forever black dressing.
-
25. Water wipe them down just past the treads. For an all out show car, remove the tires and clean inside the treads using a scrub brush with soap and water. We wrap the tires with plastic after highly detailing them and once we have the vehicle in place at a show we cut the plastic away so even the tread grooves look dead on.
-
26. Apply tire gel evenly and liberally.
-
27. The foam block applicator works well. Apply it liberally as the tires are very porous.
-
28. Wipe with a dry rag to remove the residue. Touch up if needed.
-
29. During final polishing mask the entire car with plastic and tape all the gaps to avoid polishing compounds from entering in and under trim gaps etc.
-
30. Using Finesse by 3M works great on tail light plastic to remove scratches etc.
Body Dusting
-
Dust Cover Word on the street is that the California Duster cover is the best. Some online reviews say it works great if you follow the instructions (wrap it in newspaper as directed to absorb the excess wax so it doesn't smear on your car), the unfavorable reviews had a common thread that the CA duster doesn't work well on black vehicles as it causes micro scratches and/or waxy residue that can be seen due to the dark paint.
-
Tony
-
-
I've used one for years on my Fish which is Patriot Blue and it has worked fine. I just use it to dust the car off after I uncover it in the garage. It's funny how dusty a car can get under a cover. Anyway I also dust the car with it at car shows and as it's been mentioned it will leave some fuzz from the tree sap. That cleans up fine with a little spray of touch-up and a wipe with a micro fiber towel. I also found out that if you use the Calif. Duster lightly to dust the a car, not with any pressure to get dirt off (yes I've seen this done). Maybe that's where people get micro scratches on their cars.
-
Dave Dalmas
-
-
I found that they did leave a waxy residue and were only so-so on dark colors. I haven't had a shiny car in so long that I don't know if the product is better. The best thing we have ever used was a plain cloth diaper (unused, of course...).
-
Jim Lusk
Car Covers
-
I bought one from Cal Car Cover and so far it works fine for me.
-
-
I got mine from Classic Ind. as it was cheaper and I keep my car garaged, just to keep the dust off of it. Actually my cover is stuffed in it's storage bag as it is a hassle to put it on and take it off unless it was outside which I don't leave it there. http://www.calcarcover.com
-
Mike Jarvie
Cleaning Headliners & Convertible Tops
-
Use MaryKate Ultra Vinyl Cleaner for cleaning, headliners and convertible tops.


